
8th Wall image recognition tutorial
Blog -
Last April, 8th Wall released a new feature called Image Targets that lets creators build image recognition for web-based AR. Not restricted to QR codes, Image Targets lets you select your own image (as long as the computer vision AI can detect distinct feature points) and build AR experiences with it.
This is a huge step forward for WebAR and I’m excited to share with you a quick tutorial on how to get started.
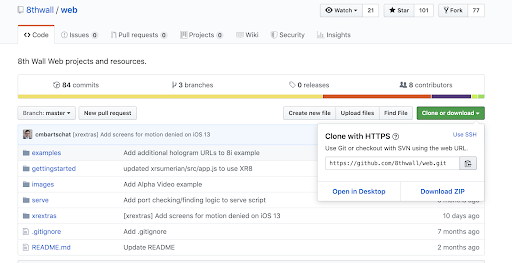
1. Download 8th Wall Web repo on Github. Click on Clone or download and copy the URL. Open your command terminal and go to your Desktop. Enter ‘git clone https://github.com/8thwall/web.git’ in your command line.
2. In your command terminal, copy the following code
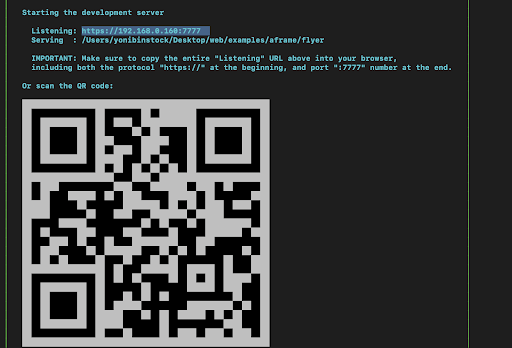
| cd serve. npm install. cd .. ./serve/bin/serve -n -d examples/aframe/flyer/ -p 7777 |
A QR code should appear in your command terminal (sometimes you have to resize the command terminal window for it to show properly).
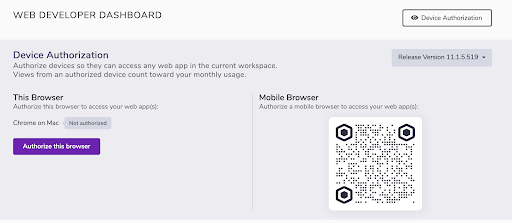
3. Log into your 8th Wall Web Developer Console (create an account if you haven’t yet). Click on Device Authorization in the top right corner and scan the QR code with your phone. If you have an iPhone, your camera app should recognize the QR code automatically. If you have an Android device, you may need to install a QR scanner from the Play Store.
4. Create a new app by clicking the ‘Create a new Web App’ button. Name it anything you like and return to the console. Under your new app, copy your app key.
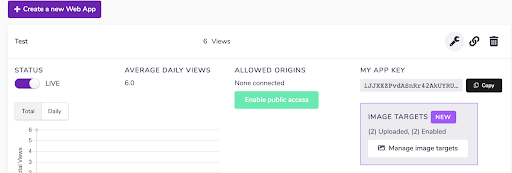
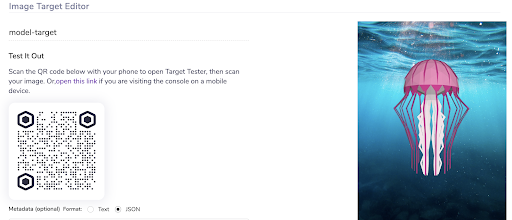
5. Now you’ll want to add the image that will produce an AR experience. or now, you can use the image from the example. Click on Mange image targets under ‘Image Targets’. On the next page, click Upload Image and from the folder you downloaded in step 1, go to ‘web/examples/aframe/flyer/targets’ and select ‘model-target.jpg’. Click on Upload. Finish by clicking on Save and enable.
6. Open your code editor, go to the directory ‘web/examples/aframe’, open the flyer example and click on index.html. On line 17, replace ‘XXXXX’ with the App Key that you copied from the console.

7. Open your terminal and scan the QR code with your phone. If, for any reason, the QR scanner doesn’t work, you can enter the localhost URL (found in your terminal after ‘Listening’) into your mobile browser (assuming your device is connected to the same WiFi network).

8. You might get a screen that says ‘Your connection is not private’. If so, click on Advanced at the bottom and then click on Proceed to https://192.168.0.160.
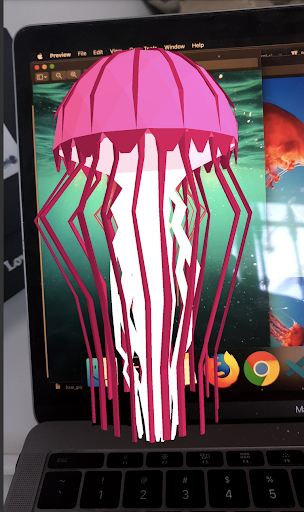
9. You will get a prompt to enable the use of the camera. To check that it worked, open the ‘model-target.jpg’ in your finder. When holding up your camera to the picture, you should see a 3D representation of a jellyfish.
10. Now try to create your own experience with your own image. You can find specifications on the type of image and other requirements on the 8th Wall Image Targets Documentation Page. After finding a new image, go back to the console and click on Upload an Additional Image. After saving and enabling, make sure to copy the marker name at the top and in your code, next to ‘xrextras-named-image-target’. Change the target name to the one you just copied. Now scan the new image with your phone and you should see the 3D model of the jellyfish.

11. There’s so much more you can do to make this AR experience your own. Check out the A-Frame documentation to try to incorporate images, videos, and your own 3D models. You can also see how Miller Lite used 8th Wall to bring their cans to life and other 8th Wall Augmented Image demos to inspire you for your own experiences.
Combining image recognition and WebAR leads to so many wonderful opportunities and brings context to the user when and where they need it. Combining real-time data and other APIs to augmented images can lead to some really cool projects. Without the need to download an app, the barriers to entry are not only lowered for consumers, but for developers and creators looking to create meaningful AR content.
If you’re interested in developing 8th Wall projects with big brands like Sony, Disney, Warner Bros, Universal, and others, sign up as a creator for Poplar Studio and get paid to build amazing AR experiences.

